Lego CATIA macro

Introduction
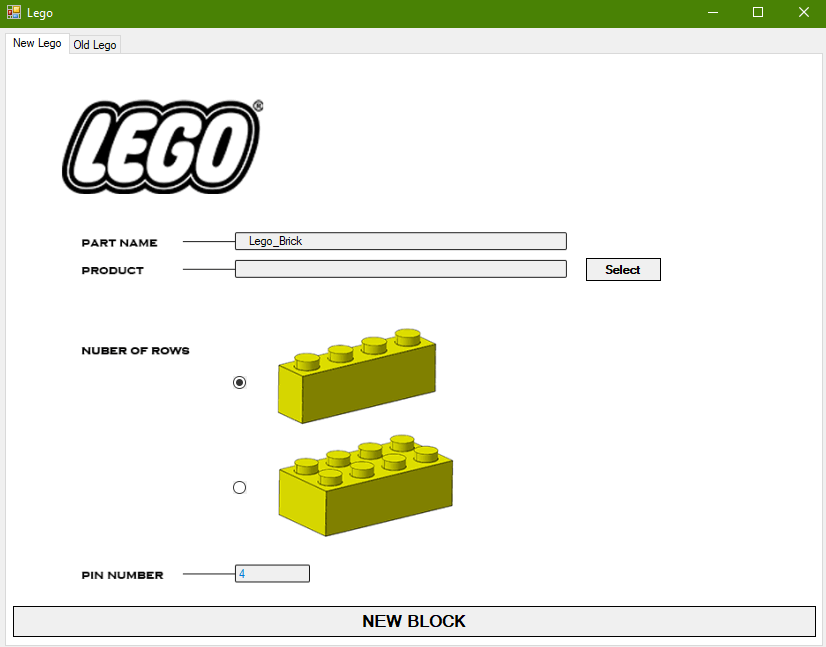
This is a new Lego CATIA macro application for making Lego blocks and inserting them into the product. We have one more post about Lego block maker. But in this post, we have a different approach. In the first post, we make everything with macro, like first, we make the pad, after that pins and so on. Hence in this post, we will not do any modeling, just change a few parameters. All modeling was done in part with rules. So you just need to create some simple rules. Because of that, we have two main controlling parameters, pin, and row number. And these two are connected with the rule.
if Number_of_row == 2
{Block_W=15.8 }
if Number_of_row ==1
{Block_W=7.8}
A first specific case is when a number of rows are 2 then the block width is 15.8 and when it is 1 then it is 7.8.
if Number_of_pins ==2
{PartBody\RectPattern.2\Activity =false}
if Number_of_pins >2
{PartBody\RectPattern.2\Activity =true}
In the second example, we want to have a pattern when a number of pins are more than 2. So you can activate or deactivate elements inside the tree.
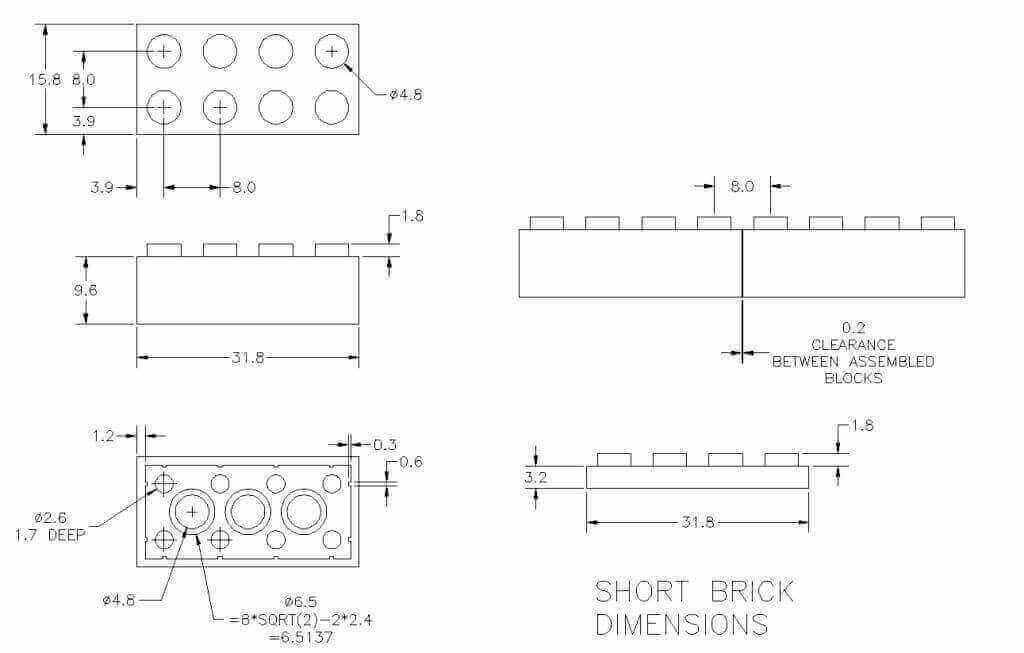
You can see all of these in the part, we will put a link for download.
We use this picture to make a model for Lego block.
Writing macro code
Steps in this CATIA macro:
1. Make selection of product
2. Make newFrom from the base part
3. Change parameters using inputBox and rules
4. Save part to the location using inputBox
5. Add the part to the product
It’s very important to make these simple steps for every macro. So you can go step by step when one is working you can go to the next and so one. It’s very hard to write full code at once and there can be a lot of errors.
Sub CATMain()

'Set location of your Product
Dim location
location= "C:\Users\Me\Desktop\New folder (3)"

'Declaration of main product where you want to add Lego bricks
Dim documents1
Set documents1 = CATIA.Documents
Dim Doc As ProductDocument
Set Doc = CATIA.ActiveDocument

'Selection of active Document
Dim oSel
Set oSel = Doc.Selection
Dim Filter(0)
FIlter(0) = "Product"
Dim sStatus as Object
sStatus =oSel.SelectElement3(Filter, "Select product", False, CATMultiSelectionMode.CATMultiSelTriggWhenUserValidatesSelection, False)

'Declaration of main product using selection
Dim product1
Set product1=oSel.Item(1).Value
Dim products1 As Products
Set products1= product1.Products


'Set location of folder with Lego Brick
'NewFrom of base part
Dim partDocument1 As Document
Set partDocument1 = documents1.NewFrom("C:\Users\Me\source\repos\Lego\Lego\bin\Debug\Lego_brick_1x2.CATPart")

'Declaring opened Part
Dim partdocument2
Set partdocument2 = CATIA.activedocument
Dim part1 As Part
Set part1 = partDocument1.Part

'Declaring parameters
Dim parameters1 As Parameters
Set parameters1 = part1.Parameters
Dim realParam1 As Parameter
Set realParam1 = parameters1.Item("Lego_brick\Number_of_row")

'Defining number of rows using inputbox
Dim InputBox_row as Integer
InputBox_row=InputBox("Plese enter 1 or 2 for pin row")

'Using info from inputBox to set partameter
If InputBox_row=1 Then
realParam1.Value = 1.0
End If
If InputBox_row=2 Then
realParam1.Value = 2.0
End If

'Using info from inputBox to set number of pins
Dim parameters2 As Parameters
Set parameters2 = part1.Parameters
Dim realParam2 As Parameter
Set realParam2 = parameters2.Item("Lego_brick\Number_of_pins")

InputBox_row=InputBox("Plese enter number of pins")
realParam2.Value = InputBox_row
part1.Update()

'Declaring active document
Dim Name
Name =partdocument2.part.name

'Using inputBox to get part name from user and save part to the location
InputBox_row=InputBox("Please enter part name")
partdocument2.GetItem(Name).PartNumber = InputBox_row
partdocument2.SaveAs location & "\" & partdocument2.name
partdocument2.Close()

'Addng part to the main product
ReDim Preserve arrayOfVariantOfBSTR1(0)
arrayOfVariantOfBSTR1(0) = location & "\" & InputBox_row & ".CATPart"
products1.AddComponentsFromFiles arrayOfVariantOfBSTR1, "All"


End Sub
Conclusion
Maybe you don’t need this Lego CATIA macro, but you can learn a lot from it.
1. How to make multiple selection and how to use it in code
2. How to make NewFrom
3. How to change the name of the part and save it to location
4. How to control part parameters from CATScript
5. How to use InputBox(user inputs) to control if statements
6. How to add a part to the product
Using this example you can easily make CATScript for inserting the base part in your model. We think that’s very good practice.
You can download it for free and use it.
If you have any issues feel free to contact me.